To repair a drywall ceiling crack effectively, start by cleaning the area and evaluating its severity. Apply mesh tape along the crack, then spread thin layers of joint compound using a putty knife. Sand each layer carefully for a smooth finish. Once dry, prime and paint the repaired area to match your ceiling. By following these steps, you'll not only fix the crack but also prevent future damage—and there's more to learn about ceiling maintenance.
Understanding the Types of Ceiling Cracks
Ceiling cracks can be more than just unsightly—they're often signals of underlying structural issues that you'll want to address promptly. Different crack patterns can indicate various causes, from normal settling to serious foundation problems. Horizontal cracks might suggest structural stress, while spider web-like hairline cracks often result from temperature changes or building movement. Large, wide cracks could point to foundation shifts or water damage. Understanding these common ceiling crack patterns helps you diagnose potential causes of ceiling cracks and determine whether you're facing a minor cosmetic issue or a more significant structural concern that requires professional assessment. For homeowners in Erie County drywall repair, professional inspection can help identify the precise nature and severity of ceiling damage.
Essential Tools and Materials for Repair
Successfully repairing drywall ceiling cracks requires gathering the right tools and materials beforehand. You'll need a putty knife, drywall tape, durable sealants, sandpaper, and a ladder for safe access.
Protective gear like safety glasses and a dust mask are indispensable for your comfort and safety. Don't forget to pick up joint compound and a paint roller for smooth application.
Wall cavity insulation can help prevent future cracks by stabilizing temperature and reducing structural movement. Investing in quality materials will guarantee a long-lasting repair that'll make your ceiling look seamless and professional.
Drywall installation experts in Erie, PA recommend using high-density, moisture-resistant materials to ensure the most durable ceiling repair possible.
Preparing the Damaged Area
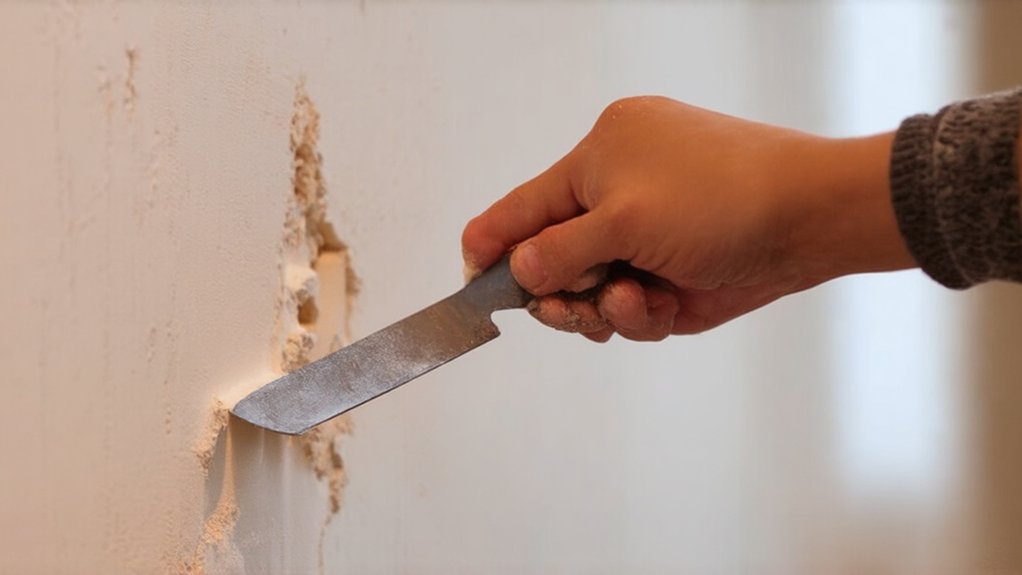
Now that you've gathered your tools and materials, preparing the damaged area requires careful attention and methodical work. Start by cleaning the area thoroughly, removing any loose debris or dust around the crack. You'll want to use a vacuum or soft brush to gently clear the surface, ensuring a clean workspace for repairs.
Next, carefully inspect the crack, determining its length, width, and severity. Look for signs of underlying structural issues or water damage. Understanding the crack's characteristics will help you choose the most effective repair strategy and prevent future damage.
Step-by-Step Crack Repair Technique
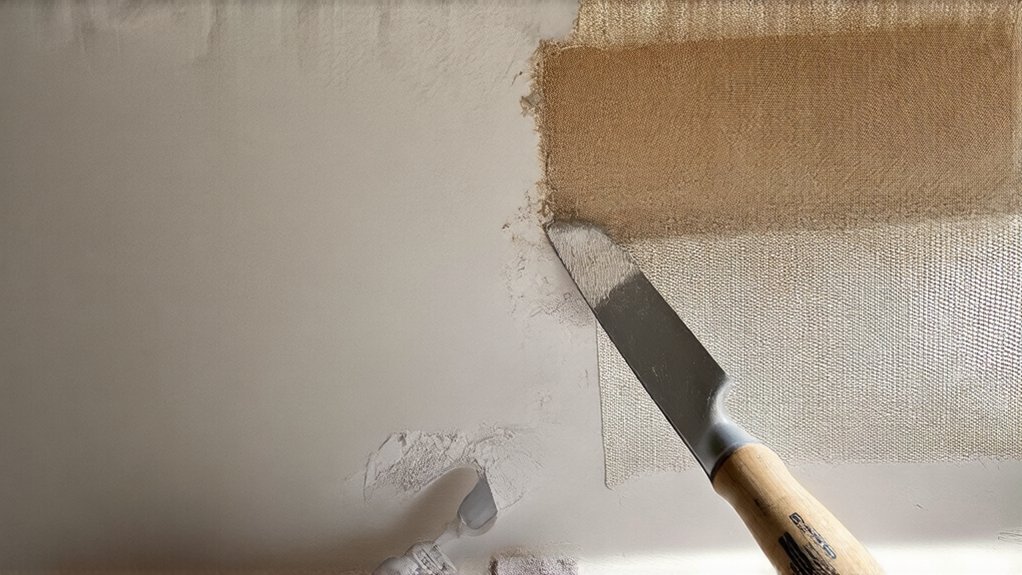
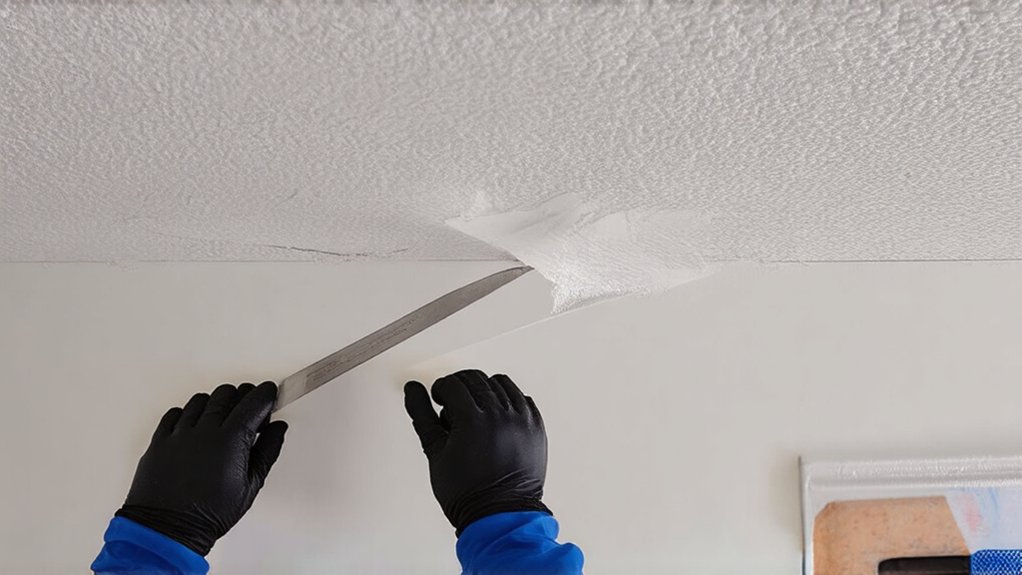
Repairing drywall ceiling cracks requires a methodical approach that'll help you restore your ceiling's smooth surface. Start by applying mesh tape along the crack's length, ensuring it's centered precisely.
Spread joint compound carefully over the tape, using a putty knife to create an even layer that'll blend seamlessly with the surrounding area. You'll want to focus on maintaining the structural integrity of the repair while addressing aesthetic considerations.
Apply multiple thin layers, allowing each to dry completely before sanding. This technique prevents future cracking and creates a professional-looking finish that'll make your ceiling look as good as new.
Finishing and Painting the Repaired Surface
After carefully applying joint compound and sanding the repaired area, you'll want to prepare the surface for a fresh coat of paint that'll restore your ceiling's pristine appearance. Choose a high-quality primer that'll help smooth texture application and conceal joint lines seamlessly.
Apply the primer with even, overlapping strokes, ensuring complete coverage of the repaired section. Once dry, select a ceiling paint that matches your existing color. Use a roller with a medium nap for the best results, applying two thin coats for a professional-looking finish that'll blend perfectly with the surrounding surface.
Preventing Future Ceiling Cracks
Several key strategies can help homeowners prevent troublesome ceiling cracks from developing in the future. Identifying common causes like foundation settling, temperature fluctuations, and moisture issues is essential for long-term maintenance.
You'll want to address underlying issues promptly, such as fixing roof leaks, controlling humidity levels, and ensuring proper structural support. Regular home inspections can catch potential problems early, saving you time and money.
Frequently Asked Questions
How Long Does a Drywall Ceiling Crack Repair Typically Last?
If you address moisture issues and use proper repair techniques, your drywall ceiling crack fix can last 5-10 years. Cracks often return if underlying structural problems aren't resolved, so monitor your home's moisture levels and foundation stability.
Can I Repair a Ceiling Crack Myself Without Professional Help?
You can tackle a ceiling crack DIY repair with basic tools like joint compound, mesh tape, and a putty knife. Follow step-by-step instructions carefully, and you'll successfully patch the crack, feeling proud of your home improvement skills.
Will Homeowners Insurance Cover Drywall Ceiling Crack Repairs?
You'll need to carefully review your insurance policy details. Depending on the crack's cause, you might qualify for coverage. Contact your agent to understand the claim filing process and determine if your specific ceiling damage is eligible for reimbursement.
How Much Does Professional Drywall Ceiling Crack Repair Cost?
You'll find professional drywall ceiling crack repair typically ranges from $300 to $1,200, depending on local pricing trends. The average repair cost varies by damage extent, but most homeowners spend around $500 for quality, lasting fixes.
Are Ceiling Cracks Always a Sign of Serious Structural Problems?
Not all ceiling cracks signal serious problems. You'll often see them due to common causes like settling, temperature changes, or minor building shifts. However, don't ignore them—some cracks might indicate underlying issues that need professional assessment.